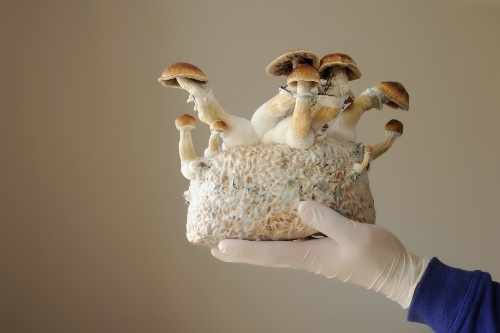
What is mushroom spawn?
Anyone who enjoys growing mushrooms will automatically come into contact with the term mushroom spawn. But what is this actually? If you know how this works, you can easily grow large quantities of mushrooms yourself. In this blog, we explain what mushroom spawn is and how you can make it yourself.
Mushroom spawn: breeding ground for mycelium
Shrooms are one of the most fascinating life forms. They are fungi that produce mind-altering substances. People have been using them for centuries, not only for the pleasure of a trip, but also to mental complaints. It can therefore be very useful if you can grow mushrooms yourself. This can of course be done easily with one of our magic mushroom grow kits. But if you want to go a step further, you can make your own mushroom spawn.
This is a bag or jar containing a healthy mycelium. The mycelium is the part of the mushroom that ensures the asexual reproduction of the fungus. You can compare it with the roots of a plant, where the mushroom is the fruit of the mycelium. The brood forms a breeding ground for the mycelium, so that it can colonize the substrate.

Different types of mushroom spawn
When you want to make a bread, you have several choices. Each type of brood brings its own advantages and disadvantages. You can read more about it below.
Grain brood
For grain bread, you use grains of grain. The mycelium grows in small tufts on the different grains of grain. Over time, these will become connected, and a large mycelium will be created. This is how you get grain brood.
Plug brood
With this species, you use sterilized pieces of wood (plugs) as a substrate. Once the mycelium has spread, you can graft it onto the main substrate. Many professional growers use plug spawn to grow mushrooms on larger pieces of wood. Especially medicinal mushrooms, such as shiitake and wig fungus, like to grow on this type of wood.

Sawdust brood
Sterilized sawdust can also be used to make brood. It is usually used as the main substrate, but it is certainly also suitable as a breeding substrate. Oyster mushrooms in particular do well.
What is the best choice now? That partly depends on your own preferences and what you want to achieve. In most cases, grain brood is the best choice for small-scale home cultivation. It is easy to use, easy to sterilize and therefore easy to make your own brood. Below you can read how to do this.
Make your own grain brood
As you may know, it is very important to work hygienically when growing mushrooms. This is certainly also the case when making mushroom spawn. Making grain brood is fairly simple, but you will have to keep the environment clean. You also need a flow hood and a glove box for this.
Purchasing a flow hood is not cheap. A glove box is easy to make yourself. These are two tools that are essential if you want to make mushroom spawn yourself. It reduces the risk of contamination, which is of course very important if you want to grow mushrooms with your own spawn. You also need a pressure cooker to sterilize the substrate.
What do you need (supplies for 1 kilo of grain brood
- Pressure cooker
- Latex gloves
- Lighter
- Micropore tape
- 500 grams Rye
- Aluminum foil
- Glass jars
- Glass jar (1062 ml)
- Clean liquid culture (spore syringe or petri dish)
- Drill or a hammer and nail
- RTV silicone
- Large pan
- 70% isopropanol
- Plaster
![]()
Step-by-step plan for making mushroom spawn
Step 1
The rye will become your brood of grain. When the water boils, place the rye in the large pot (not the pressure cooker). Add a tablespoon of plaster, this ensures that the granules do not stick together. Boil the rye for 20 minutes. Drain the water or use a sieve. Do you see any kernels split during cooking? It is better to remove them, as they are very susceptible to infections. Let the grains dry and cool to room temperature, this can be done in the pan.
Step 2
If you used 500 grams of rye, you have enough for 1 jar. If you want more, cook a multiple of 500 grams of rye. Fill a jar to about 70% with the cooked rye. The remaining space in the jar is needed to shake the contents properly.
Step 3
Remove the lid from the jar. If you use a drill, you can keep the lid on the jar. Make a hole on both sides of the lid (i.e. two holes). Place a piece of micropore tape on one of the holes. This way, air can continue to flow without your brood becoming contaminated with micro-organisms.
Are you planning a spore syringe to use? Cover the second hole with RTV silicone, making sure it is on both sides of the hole. Give it 3 hours to dry.
Step 4
Now it's time to sterilize the grain and jars. Add enough water to the pressure cooker. Place a piece of aluminum foil over the top of the pot and place it in the pan. Make sure the pressure in the pan is 1.03 Bar or 15 PSI. Cook for 2 hours and then turn off the stove. Then let the pan cool overnight and allow the pressure to release slowly.
Step 5
If you are going to use a glove box, make sure it is clean before the next step. Also clean the outside of the jars and if you are going to use a syringe, make sure you dry and clean the injection port. Sterilize the tip of the needle with a lighter and inject 1 to 2 cc of liquid into the grain.
If you use petri dishes, wipe them thoroughly first. Also sterilize the scalpel with the lighter and let it cool. Remove the lid from the jar, scoop up a little fungal culture with the scalpel, drop it into the jar and quickly put the lid back on and tighten it.
Step 6
Put the pot in a dark place that is also slightly warm. Keep an eye on the pot, within a few days you will be able to see some bright white hyphae. Shake the jar every few days. This gives the mycelium the opportunity to spread properly. Your mushroom spawn will be ready within 1 to 2 weeks, by which time the mycelium will have colonized the entire pot.
When the time comes, it's time to transfer the colonies to a bulk substrate. That gives you the opportunity to continue growing. As you can see, making mushroom spawn is not very difficult, but you do need some supplies and time. Do you think this is too much work? Don't worry, you can always choose the convenience of one of our mushroom grow kits, from 100% Mycelium, Premium or All in One.